Your oven was perfectly fine last week, and now it’s barely warming up and dinner is already planned. Here’s a practical walkthrough of the most common reasons an oven stops heating properly, what you can check yourself, and when it’s time to call in a professional.
A cold oven is one of those kitchen problems that sneaks up on you. One day your roast is taking 20 minutes longer than it should. A week later, you’re setting the temperature to 450°F and the inside feels like a warm car, not a working oven. It’s frustrating, and if you’re like most homeowners, your first instinct is to wonder whether you’re about to spend a lot of money on a repair you don’t understand.
At One Click Appliance Repair, we get calls about this kind of issue regularly from homeowners across Vancouver and the surrounding area. The good news is that oven heating problems follow a pretty predictable pattern. Most of the time, the cause is one of a handful of things and some of them are genuinely straightforward to spot before you even pick up the phone. Older homes, especially, can add a layer of complexity, since aging wiring and worn-out appliance parts tend to show up together. But wherever you’re starting from, a bit of methodical checking goes a long way.
Key takeaways
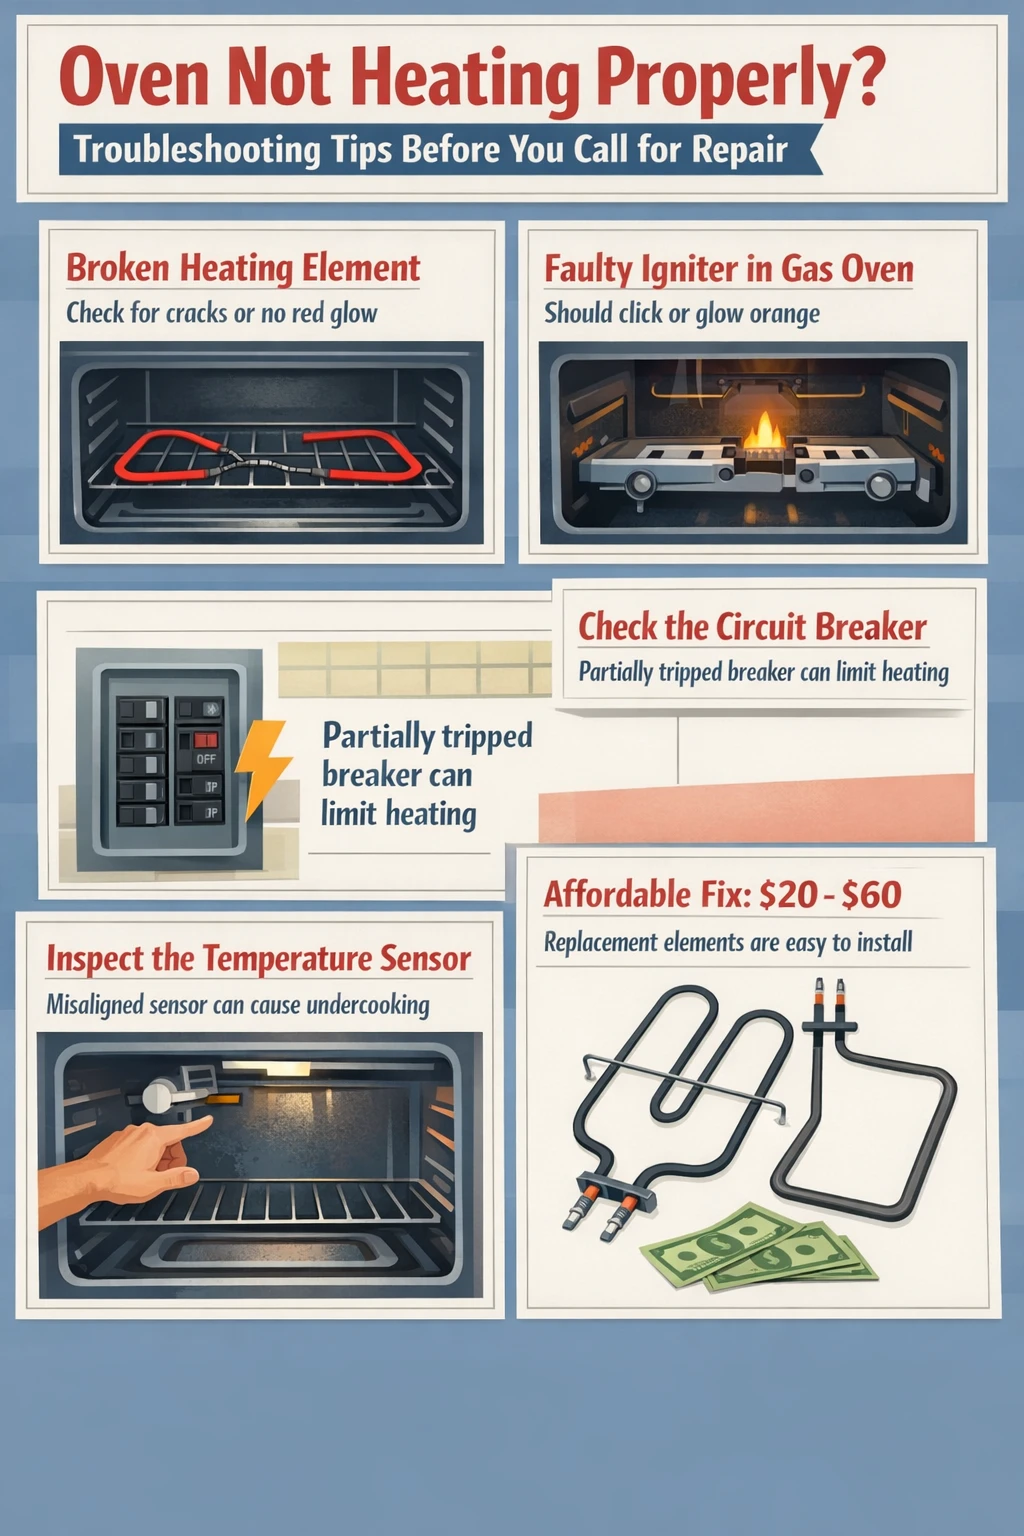
- A broken heating element is the most common reason an electric oven stops reaching temperature, and a visible inspection (looking for cracks, blisters, or a coil that doesn’t glow red) will often confirm it.
- A faulty igniter is the equivalent problem in gas ovens; if it doesn’t click or glow orange when you turn the oven on, that’s your first suspect.
- A misaligned or damaged temperature sensor can cause your oven to cut out before it reaches the set temperature, making your food consistently undercooked even when the oven “works.”
- Before anything else, check your circuit breaker. Electric ovens require a 240-volt connection, and a partially tripped breaker can leave the oven warm but nowhere near cooking temperature.
- Replacement heating elements for common models are typically inexpensive, often in the $20 to $60 range, and are available by matching your model number to the part.
- If your oven door seal is damaged or letting heat escape, no amount of troubleshooting the internal parts will fix the problem until the seal is replaced.
Why your oven isn’t heating properly
The most likely cause depends on whether you have an electric or gas oven, but in both cases the problem almost always comes down to the heat source itself, the temperature control system, or the power supply. For electric ovens, a failed heating element is the single most common culprit. For gas ovens, a weak or dead igniter is usually to blame. Everything else on this list is less common, but worth knowing.
One thing worth saying upfront: an oven that gets warm but won’t reach temperature is a different problem from an oven that’s completely cold. If you set your oven to 450°F and the inside feels like a warm summer car – maybe 100 to 120 degrees – but won’t go further, that often points to a partially failed element or a breaker issue rather than a total failure. A completely cold oven, on the other hand, usually means the element or igniter has failed entirely, or there’s a power supply problem. Knowing which situation you’re in helps narrow things down quickly.
In our experience, a lot of calls start with homeowners who’ve noticed a gradual decline over a few weeks. The oven was a little slow, then a little slower, then suddenly a roast that used to take 90 minutes is still raw at two hours. That progressive pattern almost always points to a heating element that’s been failing for a while – look for bubbling, blisters, or visible breaks on the element’s surface.
Checking your power supply first
Before you open the oven door and start inspecting parts, it’s worth ruling out the obvious. Power issues account for a surprisingly high number of “broken oven” calls, and they’re usually a five-minute fix.
Electric ovens run on a 240-volt circuit, which typically uses a double-pole breaker in your electrical panel. If one leg of that circuit trips, your oven might still turn on and show the right temperature on the display, but only get warm rather than hot. Go to your breaker panel and look for a breaker that’s sitting in the middle position rather than firmly on or off. Flip it fully off and then back on. If it trips again immediately, stop there and call an electrician – that’s a wiring problem, not an oven problem.
Also check that the oven is plugged in securely. This sounds almost too obvious to mention, but a loose connection at the outlet can produce exactly the symptoms described above. While you’re looking at the outlet, check for any discoloration, burn marks, or melted plastic around it. A damaged outlet needs an electrician before anything else happens.
Inspecting the heating element (electric ovens)
Electric ovens have two heating elements: the bake element at the bottom, which does most of the work for regular cooking, and the broil element at the top. Either one can fail, but a failed bake element is the more common scenario by a significant margin.
The easiest way to check an element is to turn the oven on and watch it for a minute or two. A working element will start to glow red or orange as it heats up. If the element stays dark, that’s your answer. You can also do a visual inspection with the oven off and unplugged: look closely at the coil for any cracks, blisters, or spots where the outer layer of metal has broken open. Those are signs of a failed element regardless of whether it glows. 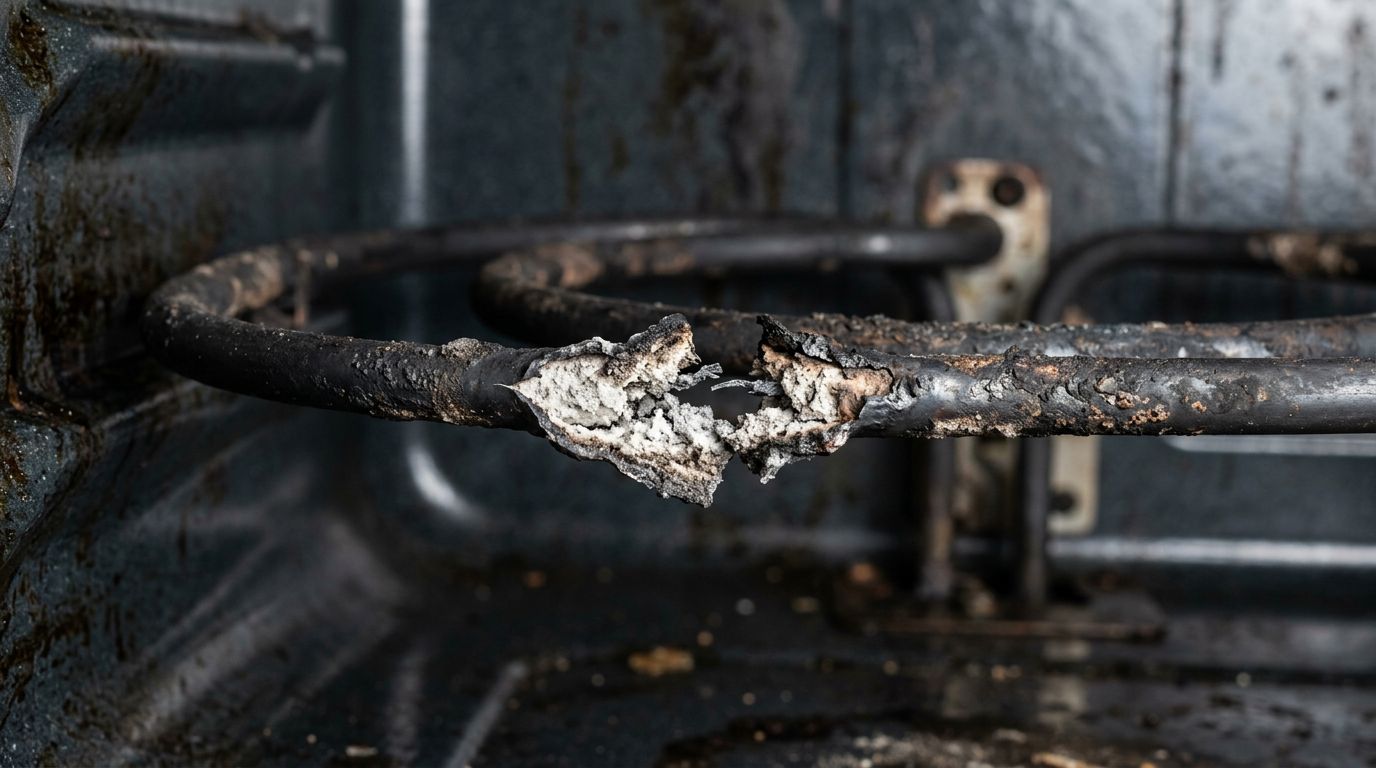
If you have a multimeter, you can test the element for continuity. A functioning element will show resistance somewhere in the range of 10 to 75 ohms. No reading at all, or a reading well outside that range, confirms failure. For most common oven models, replacement elements are easy to find by searching your model number – usually printed on a label inside the oven door or frame. Sites like RepairClinic let you look up the correct part by model number. Once you have the right part, the replacement itself involves unplugging the oven, removing a couple of screws, and swapping the element. One important note: don’t let the wires pull back into the insulation when you remove the old element. If they do, you’ll be dealing with a much bigger job to retrieve them from inside the wall of the oven.
What if both elements look fine?
If both elements glow normally but the oven still isn’t reaching temperature, the issue is likely with the temperature sensor or the control board rather than the elements themselves. Those are the next things to check.
The temperature sensor: small part, big impact
The temperature sensor is a slim metal rod, usually mounted on the back wall of the oven interior. Its job is to monitor the actual temperature inside the oven and tell the control system when to keep heating and when to cut back. When it’s working correctly, your oven temperature will fluctuate by a few degrees around your set temperature – that’s normal. When the sensor fails or shifts out of position, things go wrong fast.
A sensor that’s touching the oven wall, for example, will read the wall temperature instead of the air temperature, causing the oven to cut power to the elements far too early. The result is an oven that might reach 250°F when you’ve set it to 425°F – and food that looks right on the outside but is raw in the middle. We see this fairly often in homes around Kitsilano and other neighbourhoods with older appliance stock, where sensors can shift over years of regular use.
Start by making sure the sensor is positioned at a 90-degree angle away from the oven wall and not touching any surface other than its mounting bracket. If it looks fine positionally but you still suspect it, an oven thermometer is the simplest diagnostic tool you can buy. Place it in the center of the oven, set the temperature to 350°F, wait 20 minutes after the preheat signal, and take a reading. If it’s off by more than 25 degrees, either the sensor is failing or the oven needs calibration. The Energy Star appliance guidance page has some useful context on oven efficiency and calibration if you want to go deeper on this.
Gas oven problems: the igniter is usually the answer
If you have a gas oven that won’t heat up, the igniter is almost always where to look first. Gas ovens use an igniter to light the burner – and unlike a stovetop igniter that sparks and clicks, an oven igniter glows. It heats up to a temperature high enough to open the gas valve and ignite the gas flowing through.
When the igniter is weak or failing, it may still glow, but not get hot enough to open the gas valve reliably. You might hear the oven trying to light, see a brief flicker of flame, and then nothing. Or the oven might eventually light but take five or six minutes to do so. A healthy igniter should light the gas within about 90 seconds of turning the oven on. 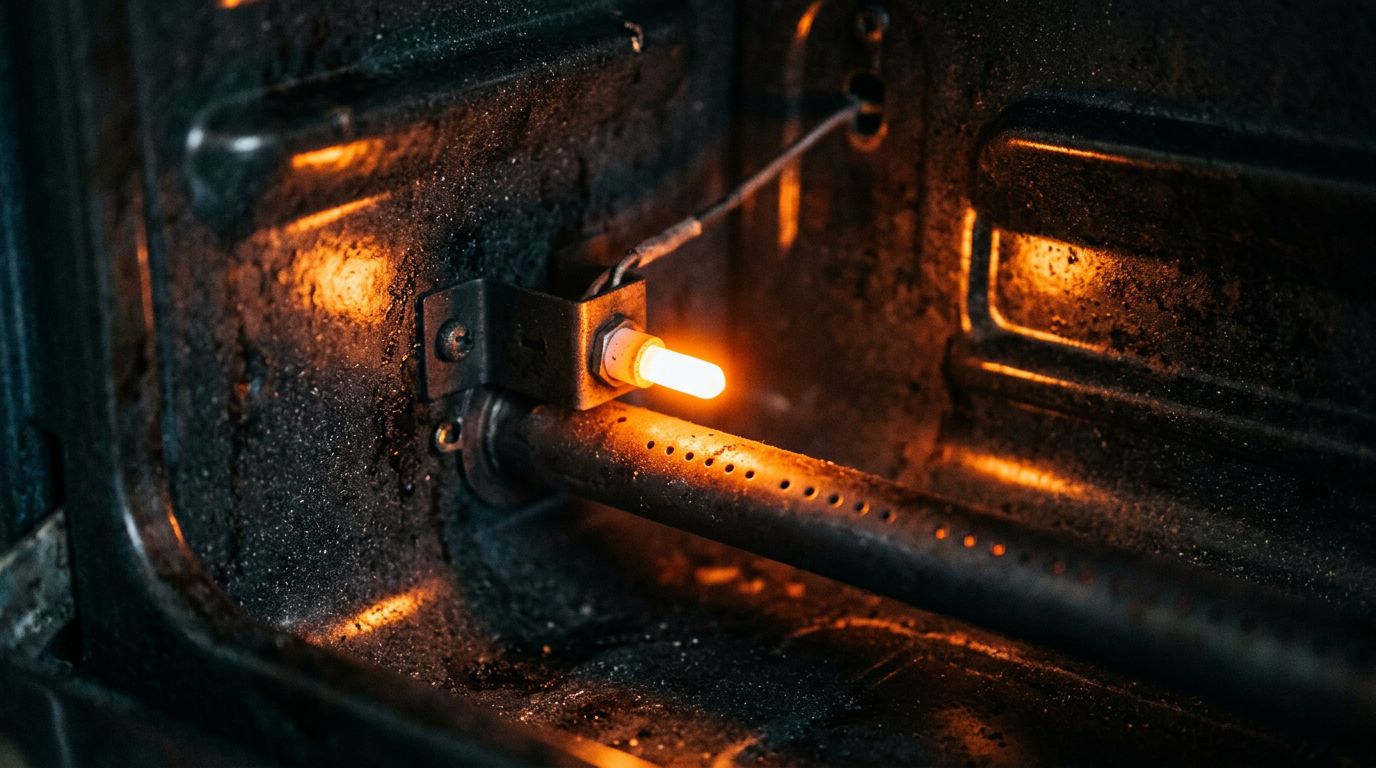
Visually, a failing igniter often looks cracked, discolored, or simply doesn’t glow at all when you turn the oven on. Because this repair involves gas, it’s genuinely worth having a professional handle the replacement if you’re not comfortable with it. A gas line that isn’t reconnected properly is a real hazard – nobody wants to come home to that. While you’re at it, make sure the gas supply valve behind the range is fully open, especially if the oven was recently moved or serviced.
Calibration, door seals, and a few other things worth checking
Not every heating problem means a broken part. Sometimes the oven is working exactly as intended – it’s just not calibrated correctly. If your food consistently comes out underdone at the right settings, or if an oven thermometer shows a consistent 35 to 50 degree gap between the set temperature and the actual temperature, calibration is worth trying before you replace anything.
Many ovens with electronic controls allow you to adjust the calibration through the settings menu. A common method: press and hold the BAKE and BROIL buttons simultaneously for about two seconds until the display shows “SF,” then use the BAKE button and the + or – keys to adjust the temperature up to 35°F in either direction. Press START to save. Check your owner’s manual for the exact steps for your model, since this varies by brand.
The door seal is another thing people overlook. If the rubber or fiberglass gasket around the oven door is torn, compressed flat, or has food debris stuck in it, heat escapes continuously and the oven struggles to maintain temperature. Run your hand slowly around the edge of the door while the oven is on – if you feel warm air escaping, the seal needs replacing. Replacement door gaskets are usually model-specific and available through the manufacturer. This is a cheap fix that makes a noticeable difference, especially in homes in areas like East Vancouver where older appliances are common. 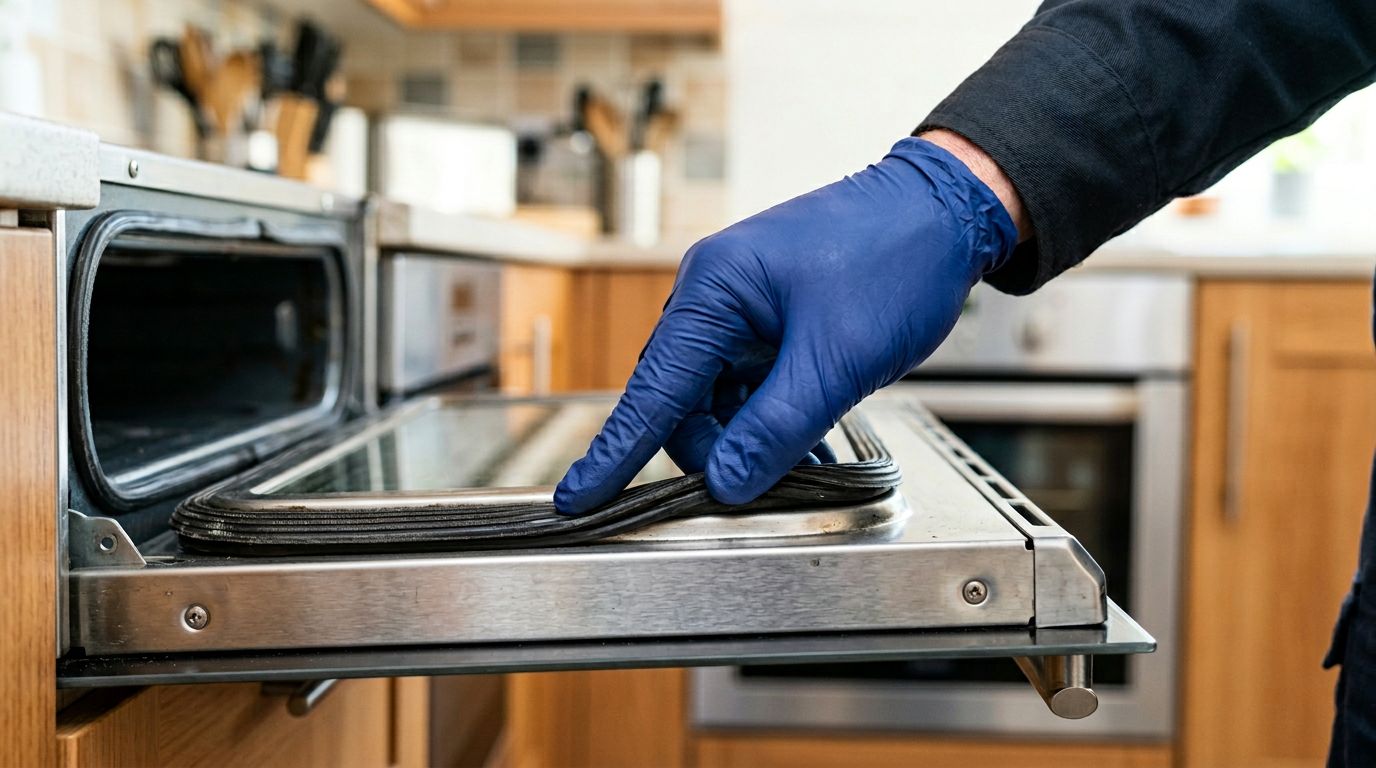
For ovens with physical thermostat knobs, it’s also worth checking that the knobs are seated properly and not cracked or slipping. A knob that spins without engaging the shaft below it won’t actually change the temperature setting, no matter how carefully you position it.
Frequently asked questions
These are the questions we hear most often when homeowners are working through an oven heating problem. Some have clear answers, a few depend on what you find when you look.
Why is my oven warm but won’t reach the set temperature?
This usually points to one of three things: a partially failed bake element, a temperature sensor that’s giving incorrect readings, or a circuit breaker issue where only one leg of the 240-volt circuit is working. Start with the breaker panel, then inspect the bake element for visible damage, then check whether the sensor is touching the oven wall.
If you set the oven to 450°F and the inside feels like a warm day rather than a working oven, the element may still be drawing some power but not functioning at full capacity. That progressive failure pattern is common, and a visual inspection of the element (looking for blisters or breaks) will usually confirm it.
My stovetop works fine but the oven won’t heat. What’s going on?
The stovetop burners and the oven use completely separate components, so one can fail without affecting the other. If your stovetop works but the oven doesn’t, the problem is almost certainly inside the oven itself – a failed bake element, a faulty igniter in a gas model, or a control board issue. It’s not a power supply problem, since the stovetop is drawing power fine.
Can I replace a heating element myself?
In most cases, yes. It’s one of the more straightforward appliance repairs out there, and plenty of homeowners do it successfully with no prior experience. The main requirements are: unplug the oven completely before you start, identify the correct replacement part using your model number, and be careful not to let the wires retract into the oven cavity when you remove the old element. If the wires pull back into the insulation, retrieving them requires pulling the oven away from the wall and removing the back panel – a much bigger job. Beyond that, it’s a matter of a couple of screws and a wire connection.
When should I call a professional instead of fixing it myself?
Call a professional if: the repair involves gas lines, the circuit breaker keeps tripping after you reset it, you suspect the control board is at fault (these are harder to diagnose accurately without testing equipment), or you simply aren’t confident about what you’re looking at. There’s no shame in stopping at the inspection stage and handing it off. A good technician will explain what they found and why a part needs replacing before they do any work.
Is it worth repairing an older oven, or should I just replace it?
A reasonable rule of thumb: if the repair costs less than half the price of a comparable replacement, and the oven is less than 10 to 12 years old, repair usually makes sense. A heating element replacement at $20 to $60 for the part is almost always worth doing. A control board replacement on a 15-year-old oven, where the board alone might cost $150 to $250, is a closer call. Consider what else might be on its way out before committing to a significant repair on an older appliance.
Wrapping up
Most oven heating problems come down to a small list of usual suspects: a failed heating element or igniter, a temperature sensor that’s out of position or broken, a power supply issue at the breaker, or a door seal that’s letting heat escape. Start with the simple checks first – breaker, element glow, door seal – before assuming the worst. Many of these repairs are genuinely manageable for a careful homeowner, and knowing what the problem is before you call anyone puts you in a much better position to make a good decision about next steps. If you’d rather have someone walk through it with you, or if you’ve worked through the basics and still can’t find the issue, One Click Appliance Repair handles oven repair, stove repair, and a full range of appliance work across Vancouver and the surrounding area. Give us a call and we’ll help you figure out what’s actually going on and what it will take to fix it.
